Ultimate Guide to Backyard Pickleball Court Drainage: DIY Solutions, Installation & Maintenance
Introduction
This guide explains how to create reliable drainage for a backyard pickleball court. Readers will understand the principles of surface water management, evaluate product options, follow step‑by‑step installation procedures, and learn maintenance routines that extend the life of the court.
The focus is on affordable, do‑it‑yourself (DIY) techniques that work for residential properties. The guide also highlights two Natotela products that integrate seamlessly with a typical court layout.
Background and Context
Pickleball courts are typically constructed on compacted soil or concrete slabs. Even a modest amount of rain can collect in low spots, creating slippery conditions and damaging the playing surface. Proper drainage prevents standing water, reduces erosion, and protects the underlying foundation.
Key concepts include surface grading, sub‑base permeability, and the use of channel drains to direct water away from the playing area. A well‑designed system balances gravity flow with the capacity of the drain components.
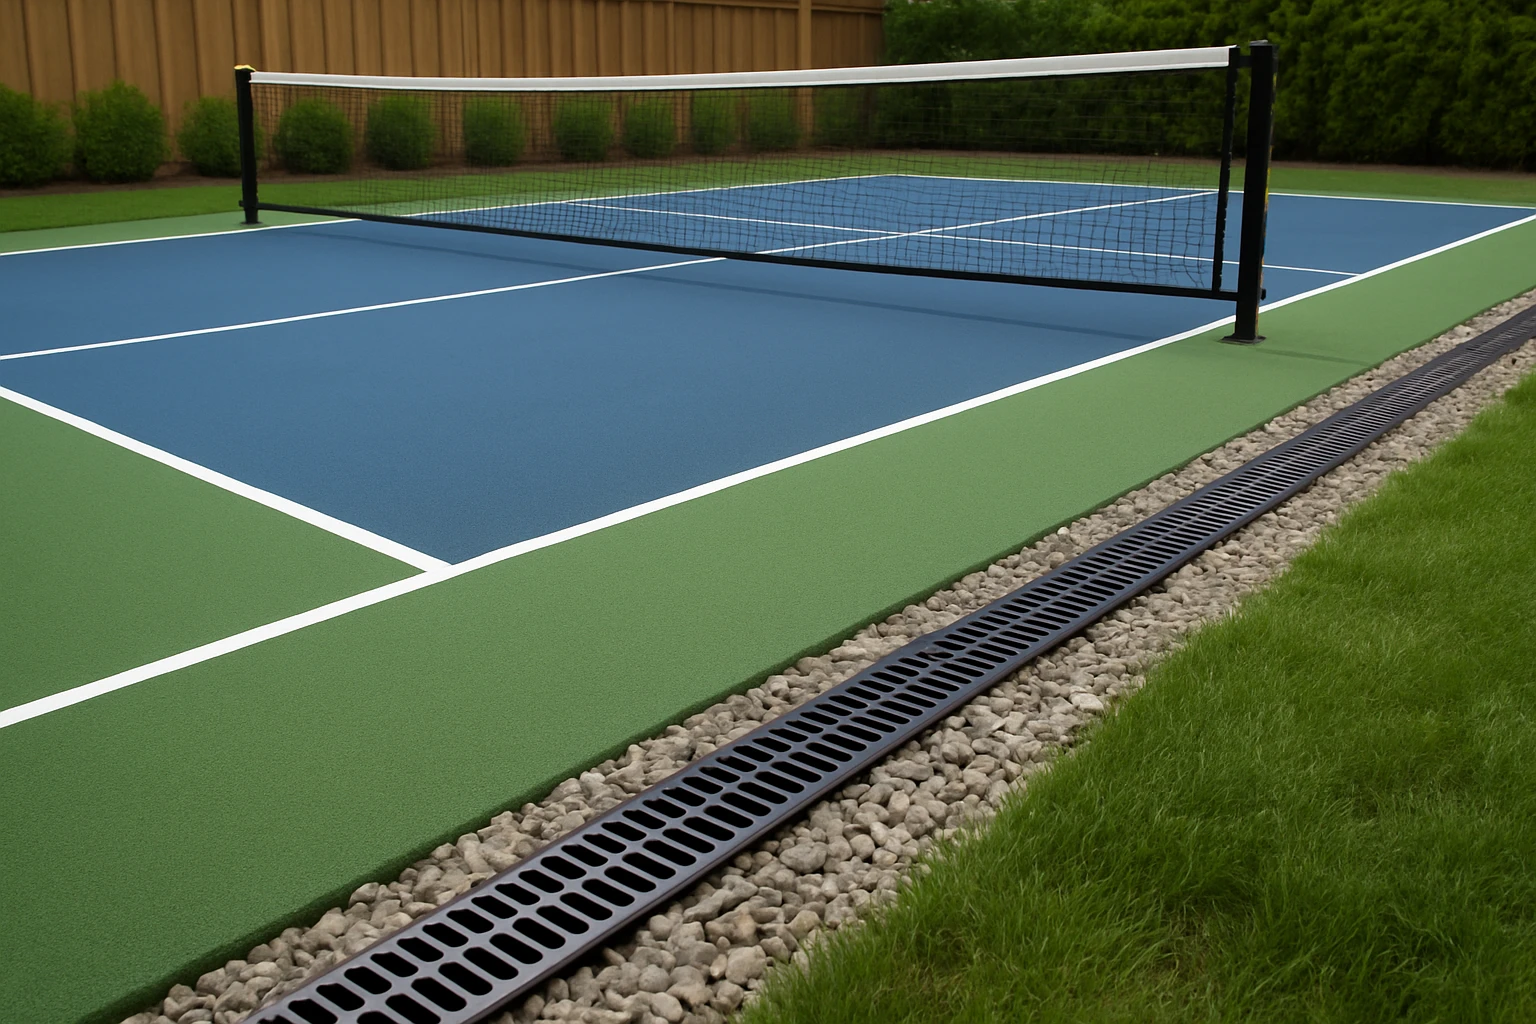
Designing an Effective Drainage System
Before purchasing any hardware, assess the site. Measure the court dimensions (usually 20 ft × 44 ft for doubles) and note the natural slope of the surrounding yard. A minimum slope of 1‑2 % (approximately 1‑2 inches per 10 feet) guides water toward the drain.
Two primary strategies are common:
- Perimeter Drainage: Install a channel drain along the outer edge of the court. Water runs along the perimeter and exits through a pipe.
- In‑Floor Drainage: Embed a perforated pipe beneath the concrete slab and connect it to a surface drain.
For most backyard installations, perimeter drainage offers the simplest and most cost‑effective solution. The following sections describe how to implement this approach using Natotela products.
Recommended Products
The Natotela HDPE Trench Drain 6‑Pack provides a modular, high‑density polyethylene (HDPE) channel that can be linked to create a continuous runoff path. Each section measures 39.4 in × 6.1 in × 5.5 in and includes reinforced ribs, a perforated grate, and multiple outlet sizes. The system is rated A15 for load capacity and has a 3.9‑star rating from 141 reviews.
For lighter traffic areas such as a driveway that feeds the court, the Natotela Driveway Channel Drain offers a single‑section HDPE grate capable of supporting up to 6,600 lb. It carries a perfect 5‑star rating from 11 reviewers and is priced at $45.99.
Installation Steps
1. Mark the Drain Path
Using a string line and level, outline the desired location of the perimeter drain. Ensure the line follows the 1‑2 % slope toward the existing storm‑water outlet.
2. Excavate the Trench
Dig a trench 6 inches wide and 6 inches deep. The depth allows the HDPE channel to sit below the surface while leaving room for a sand base.
3. Prepare the Base
Lay a 2‑inch layer of washed sand and compact it with a plate compactor. The sand creates a stable, level platform for the drain and improves drainage beneath the channel.
4. Assemble the Channel
Slide the first section of the Natotela HDPE Trench Drain 6‑Pack into the trench. The grate locks into the channel without screws, simplifying alignment. Continue adding sections until the desired length is reached; the package provides six sections for a total of 236.22 inches.
5. Connect Outlets
Attach the appropriate outlet adapters (1‑7/8 in or 3‑1/8 in) to the bottom of the channel. Align the outlet with a PVC pipe that leads to the storm‑drain or a dry well.
6. Backfill and Grade
Cover the channel with sand and then with the excavated soil. Tamp the backfill to eliminate voids. Finish by grading the surface so that water flows toward the drain.
7. Test the System
Run water from a hose along the court surface. Observe the flow into the channel and verify that no pooling occurs. Adjust the slope if necessary before finalizing the backfill.
Comparison and Selection Guide
| Feature | Natotela HDPE Trench Drain 6‑Pack | Natotela Driveway Channel Drain |
|---|---|---|
| Length per package | 236.22 in (6 sections) | 39.37 in (single section) |
| Load capacity | A15 (heavy foot traffic) | 6,600 lb (light vehicle traffic) |
| Price | $164.99 | $45.99 |
| Rating | 3.9/5 from 141 reviews | 5/5 from 11 reviews |
| Key design | Perforated grate, reinforced ribs, multiple outlet sizes | Heavy‑duty HDPE grate, reinforced ribs |
| Best use case | Perimeter drainage for a pickleball court | Driveway or garage runoff feeding the court |
Choose the 6‑Pack when a continuous perimeter channel is required. Select the single‑section driveway drain when the drainage point is short or when the system must support occasional vehicle loads.
Best Practices & Tips
- Always verify that the outlet diameter matches the PVC pipe size. The Natotela kits include adapters for 3 in and 4‑5/16 in outlets.
- Use a geotextile fabric between the sand base and backfill to prevent soil migration into the channel.
- Install a removable grate cover during construction to allow easy cleaning of debris.
- Consider adding a small dry well at the end of the channel to store excess water during heavy storms.
- Schedule annual inspections after the first winter. Clear any accumulated leaves or sediment to maintain flow capacity.
Frequently Asked Questions
Q1: Can I install the Natotela drain on a concrete slab?
A: Yes. Cut a shallow groove into the cured concrete using a concrete saw, then embed the HDPE channel. Seal the edges with a waterproof epoxy.
Q2: What is the recommended slope for a backyard court?
A: A slope of 1‑2 % (1‑2 inches per 10 feet) is sufficient to move water toward the drain without affecting playability.
Q3: Do I need a professional plumber for the outlet connection?
A: Basic PVC connections can be completed by a competent DIYer. Ensure the pipe is securely glued and that the joint is below grade to avoid freezing.
Q4: How often should the grate be cleaned?
A: Inspect the grate after each major rain event and clean any debris at least twice a year.
Q5: Will the HDPE material resist UV degradation?
A: HDPE is UV‑stable for outdoor use, especially when the surface is shaded by the court netting or surrounding foliage.
Q6: Can the system handle frozen water in winter?
A: The perforated design reduces ice buildup, but installing a slight incline away from the court helps melt water before it freezes.
Q7: Is it possible to create a curved channel?
A: The standard Natotela sections are straight. For curved layouts, contact the Natotela store for custom kits designed for bends.
Conclusion
Effective drainage is essential for a safe and durable backyard pickleball court. By understanding grading principles, selecting the appropriate Natotela channel drain, and following the installation steps outlined above, homeowners can achieve professional‑grade results without excessive cost. Regular maintenance will preserve performance for years to come.
Products Featured in This Guide
Natotela HDPE Trench Drain 6‑Pack
Price: $164.99 | Rating: 3.9/5 (141 reviews)
Featured because it provides a modular, high‑strength perimeter channel that meets the load requirements of a busy pickleball court.
Natotela Driveway Channel Drain
Price: $45.99 | Rating: 5/5 (11 reviews)
Featured because it offers a heavy‑duty, single‑section solution for driveway runoff that can be integrated with the court’s drainage network.
Frequently Asked Questions
What is the most important step when designing drainage for a backyard pickleball court?
Establish a proper surface grade that slopes away from the playing area toward the drain locations.
Can I install a channel drain myself, and what tools are needed?
Yes, DIY installation is feasible; you’ll need a shovel, compacted sub‑base material, a level, a concrete saw or grinder, and the drain kit.
How do Natotela’s drainage products integrate with a standard court layout?
Natotela offers pre‑formed channel drains and perimeter grates that fit directly into the court’s perimeter and connect to existing downspouts or a French drain.
What maintenance routine helps keep the court drainage effective?
Inspect and clear debris from drains monthly, re‑grade any low spots after heavy rain, and reseal joints annually.
Is a permeable sub‑base necessary, and what material works best?
A permeable sub‑base is essential; crushed stone or gravel with a minimum 4‑inch depth provides optimal water flow and stability.